Michaela Kiersch Just Sent Her Second 5.15a
She also got her first 5.14a onsight with ‘Crimptonite,’ in Oliana.

Don't miss new content!
Follow the brand to see our content on your activity feed!
She also got her first 5.14a onsight with ‘Crimptonite,’ in Oliana.
We’ll take your word for it!
A lightweight vest is the most versatile layer for any climbing discipline. Here’s why Patagonia’s Nano-Air Light is my favorite.
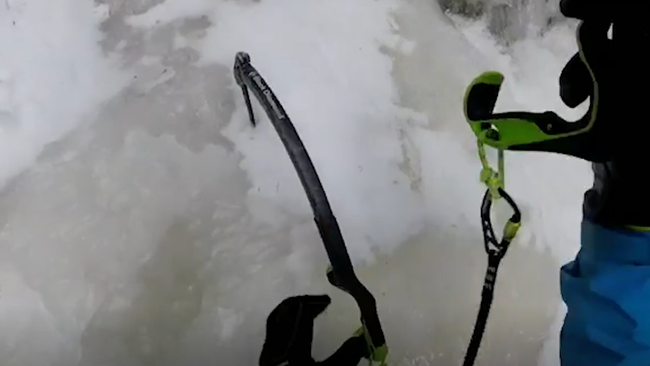
In this excerpt from Ian Nicholson's new book, "Climbing Self-Rescue," two young climbers get over their heads in Alaska’s Ruth Gorge and wish that they knew the sorts of specialized rappelling techniques that Nicholson describes in Chapter 4.
This is one of the worst anchors we've ever seen and is an inappropriate use of equipment.
Rope stretch and miscommunication are not to be underestimated.
If I was going to Céüse or Siurana or the New River Gorge tomorrow, I’d pack the Sigma first.
Leo Cea Bliedtner has completed the second ascent of ‘Tecnoking’ (5.14d) in Las Chilcas, Chile.
Added bonus: Ondra takes the most surprising whipper I’ve ever seen.
Our gear expert weighs in.
It's no fun climbing in the sun.
This eight-phase (12-month) training series will present specific workouts based on the principles of periodization. Each six-week segment will build upon the previous one.
Honnold is famous for (among other things) cramming as much climbing as he can into each day. To do so, he's developed some efficiency tricks that the rest of us can imitate.
The void swallowed him alive, his streaking form more easily imagined than described. The air froze in my chest.
There are two miracles in this week's whipper: 1) He survived. 2) He caught the fall on video.
Stop wasting your money on shoes that don't fit or are painful or fail you. Don't be disappointed again. Here's how to buy what' just right, just for you.
When one of the world’s best crack climbers was grounded by chronic fatigue syndrome, his life became an uphill struggle just to feel human again.
They figured they knew enough about climbing to wing it, but took a dangerous risk that could have cost them.
During my senior year of high school, my friends and I were bored. We decided we collectively knew enough about climbing for it to be safe. We went to the local outfitter and bought harnesses, carabiners, and belay devices, but we scoffed at the price of a rope. It was way outside our budget. Instead, we went to Home Depot and bought 100 feet of poly cord that was rated for 200 pounds. We climbed on that rope all day, just easy 5.3 climbing on toprope. I’ve included a couple photos. It wasn’t until I was lowering at the end of the day that I realized what a mistake I’d made. The 100-foot rope had stretched to about 200 feet, shrinking to the size of 8mm cord. I bought a real climbing rope the following week. Wanted to share because we are all new at some point and even with the best intentions mistakes are made. We should collectively work together to improve safety across the sport. I wish someone would have stopped us from climbing on that poly rope.
—Kyle Harris, via email
—
LESSON: Modern climbing ropes include a number of climber-friendly features. They can hold thousands of pounds of force. They have durable sheaths that prevent abrasion and cutting. They have the ideal amount of stretch to catch a fall softly, and then bounce back to their original length and diameter. They’re supple and easy to tie and untie. They’re tested to meet rigorous safety standards. And they work great with modern belay devices. A random hardware store rope is not designed with any of these goals in mind, and can’t be expected to meet them. Always use proper climbing gear designed and rated for climbing.
Want more? Check out more installments in our ever-growing hall of shame:
Lucky He Didn’t Die. Lowered From a Toy Carabiner